
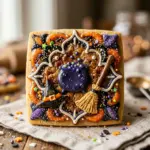
Gather around, sisters! If you are looking for the perfect treat to celebrate the spookiest season of the year, these Hocus Pocus sugar cookies are exactly what you need. Inspired by Winifred Sanderson’s iconic spellbook, these cookies are as delicious as they are enchanting. Whether you are hosting a movie marathon or a Halloween party, these “Boook” cookies will surely be the star of the dessert table.
Sugar cookies are a classic favorite because they are soft, buttery, and hold their shape perfectly. By adding a bit of creative decoration, we transform a simple recipe into a magical tribute to everyone’s favorite Halloween trio. Let’s get into the kitchen and conjure up some sweetness!
Recipe Information
- Prep Time: 45 minutes
- Cook Time: 10 minutes
- Total Time: 55 minutes
- Servings: 24 cookies
- Difficulty Level: Medium
Nutrition Information
- Calories per serving: 185 kcal
- Protein: 2 g
- Carbohydrates: 26 g
- Fat: 8 g
- Fiber: 1 g
- Sugar: 14 g
- Sodium: 115 mg
Why Make This Hocus Pocus Sugar Cookies Recipe
This recipe is the ultimate way to bring the magic of the Sanderson Sisters into your home. Unlike basic round cookies, these are shaped like spellbooks, making them a fantastic conversation starter and a highly Instagrammable treat. They are perfect for kids and adults alike who love the nostalgia of the classic film.
Beyond the looks, the recipe uses a reliable no-spread sugar cookie base. This means your “books” will stay perfectly rectangular in the oven, providing a flat and stable surface for all your spooky decorations. It is a fun, creative project that tastes just as good as it looks.
How to Make Hocus Pocus Sugar Cookies Recipe
Making these cookies involves preparing a sturdy dough, cutting them into rectangles, and using simple icing techniques to create the look of aged leather and “The Eye.” Follow these steps to create your own edible magic.
Ingredients
- 1 cup unsalted butter, softened
- 1 cup granulated sugar
- 1 large egg
- 1 teaspoon vanilla extract
- 1/2 teaspoon almond extract
- 3 cups all-purpose flour
- 1/2 teaspoon baking powder
- 1/4 teaspoon salt
- Black and brown gel food coloring
- Candy eyeballs
- Silver or grey royal icing (for the stitching and lock)
- Black royal icing (for the book details)
Directions
Step 1: Cream the Butter and Sugar
In a large mixing bowl or the bowl of a stand mixer, beat the softened butter and granulated sugar together. Mix on medium-high speed for about 2 to 3 minutes until the mixture is light and fluffy. This creates the perfect base for a soft cookie.
Step 2: Add Wet Ingredients
Add the egg, vanilla extract, and almond extract to the butter mixture. Continue to beat until everything is well combined. If you want the dough itself to be dark like the book, add a few drops of brown and black gel food coloring at this stage.
Step 3: Mix the Dry Ingredients
In a separate medium bowl, whisk together the all-purpose flour, baking powder, and salt. Slowly add the dry ingredients to the wet ingredients while mixing on low speed. Mix just until the flour disappears to avoid overworking the dough.
Step 4: Chill the Dough
Divide the dough into two disks and wrap them tightly in plastic wrap. Place them in the refrigerator for at least 30 minutes. Chilling prevents the cookies from spreading too much in the oven and makes the dough easier to roll out.
Step 5: Roll and Cut
Preheat your oven to 350°F (175°C). On a lightly floured surface, roll out the dough to about 1/4-inch thickness. Use a knife or a rectangular cookie cutter to cut out shapes that resemble small books. Place them on a baking sheet lined with parchment paper.
Step 6: Bake the Cookies
Bake the cookies for 8 to 10 minutes. The edges should be set but not browned. Let the cookies cool on the baking sheet for 5 minutes before transferring them to a wire rack to cool completely before decorating.
Step 7: Decorate the Spellbook
Once cool, use the grey or silver icing to draw “stitching” lines around the edges and a semi-circle on the right side for the lock. Place a dab of icing on the back of a candy eyeball and press it into the center of the right side. Use black icing to draw the “eyelid” and extra wrinkles to make the book look old and weathered.
How to Serve Hocus Pocus Sugar Cookies Recipe
These cookies look amazing when served on a dark, gothic-style platter or a wooden board to mimic a witch’s cottage. You can pair them with a “Witch’s Brew” punch or a hot cup of cocoa. They are the perfect centerpiece for a Halloween dessert table alongside other spooky treats like candy corn or chocolate spiders.
How to Store Hocus Pocus Sugar Cookies Recipe
Store your finished cookies in an airtight container at room temperature for up to 5 days. If you need to stack them, wait until the icing is completely dry and hard, then place a sheet of parchment paper between the layers to prevent the decorations from smudging. You can also freeze the undecorated baked cookies for up to 3 months.
Expert Tips for Perfect Hocus Pocus Sugar Cookies Recipe
To get the best results, always use gel food coloring instead of liquid coloring. Gel is more concentrated and won’t change the consistency of your dough or icing. Another tip is to make sure your butter is at room temperature—not melted—to ensure the cookies have a soft, tender crumb. Finally, if the dough gets too soft while you are cutting out shapes, pop it back in the fridge for 10 minutes to firm up.

Delicious Variations
You can change the flavor of these cookies by replacing the almond extract with lemon zest or peppermint extract. If you aren’t a fan of royal icing, you can use chocolate ganache to coat the cookies for a richer flavor. For a more “distressed” look, you can lightly brush the edges of the cookies with cocoa powder using a dry food-safe brush to make them look like ancient parchment.
Frequently Asked Questions
Q: Can I use store-bought cookie dough?
A: Yes, you can use a tube of store-bought sugar cookie dough. Just be sure to mix in about 1/4 cup of extra flour so the dough is stiff enough to hold its rectangular shape during baking.
Q: How do I make the icing look like silver metal?
A: Mix a tiny drop of black food coloring into white royal icing to get a grey shade. Once the icing dries, you can brush on some edible silver luster dust for a metallic finish.
Q: Why did my cookies spread and lose their book shape?
A: This usually happens if the dough was too warm or if the butter was too soft. Make sure to chill the dough thoroughly before rolling and cutting.
Q: Do I have to use royal icing?
A: Royal icing is best for detailed decorations because it dries hard, but you can use buttercream if you prefer. Just keep in mind that buttercream stays soft and is harder to stack.
Q: Can I make these gluten-free?
A: Yes! You can substitute the all-purpose flour with a 1:1 gluten-free baking flour blend. The results will still be delicious and spooky.
Conclusion
Making Hocus Pocus sugar cookies is a wonderful way to celebrate the Halloween season with a touch of cinematic magic. They are buttery, sweet, and visually stunning. With just a little bit of patience during the decorating process, you will have a batch of spellbooks that even Winifred Sanderson would be proud of. Happy baking!

Hocus Pocus Sugar Cookies Recipe
- Cook Time: 55 minutes
- Total Time: 55 minutes
- Diet: Vegetarian
Ingredients
- 1 cup unsalted butter, softened
- 1 cup granulated sugar
- 1 large egg
- 1 teaspoon vanilla extract
- 1/2 teaspoon almond extract
- 3 cups all-purpose flour
- 1/2 teaspoon baking powder
- 1/4 teaspoon salt
- Black and brown gel food coloring
- Candy eyeballs
- Silver or grey royal icing (for the stitching and lock)
- Black royal icing (for the book details)
Instructions
- In a large mixing bowl or the bowl of a stand mixer, beat the softened butter and granulated sugar together. Mix on medium-high speed for about 2 to 3 minutes until the mixture is light and fluffy. This creates the perfect base for a soft cookie.
- Add the egg, vanilla extract, and almond extract to the butter mixture. Continue to beat until everything is well combined. If you want the dough itself to be dark like the book, add a few drops of brown and black gel food coloring at this stage.
- In a separate medium bowl, whisk together the all-purpose flour, baking powder, and salt. Slowly add the dry ingredients to the wet ingredients while mixing on low speed. Mix just until the flour disappears to avoid overworking the dough.
- Divide the dough into two disks and wrap them tightly in plastic wrap. Place them in the refrigerator for at least 30 minutes. Chilling prevents the cookies from spreading too much in the oven and makes the dough easier to roll out.
- Preheat your oven to 350°F (175°C). On a lightly floured surface, roll out the dough to about 1/4-inch thickness. Use a knife or a rectangular cookie cutter to cut out shapes that resemble small books. Place them on a baking sheet lined with parchment paper.
- Bake the cookies for 8 to 10 minutes. The edges should be set but not browned. Let the cookies cool on the baking sheet for 5 minutes before transferring them to a wire rack to cool completely before decorating.
- Once cool, use the grey or silver icing to draw “stitching” lines around the edges and a semi-circle on the right side for the lock. Place a dab of icing on the back of a candy eyeball and press it into the center of the right side. Use black icing to draw the “eyelid” and extra wrinkles to make the book look old and weathered.