Spooky Eyeball Cake Pops Recipe
- Cook Time: 90 minutes
- Total Time: 1 hour 30 minutes
- Diet: Not specified
Ingredients
- 1 box (15.25 oz) chocolate or vanilla cake mix (plus ingredients called for on the box)
- 1/2 cup vanilla or cream cheese frosting
- 24 ounces white candy melts or white chocolate wafers
- 24 lollipop sticks
- 24 blue or green M&Ms (or large candy eyes)
- Red edible ink marker or red gel food coloring
- Black edible ink marker or a small amount of dark chocolate (for pupils)
- 1 tablespoon coconut oil or shortening (optional, for thinning chocolate)
Instructions
- Step 1: Bake and Cool the Cake
Prepare the cake mix according to the package instructions using a standard baking pan. Once finished, remove it from the oven and let it cool completely to room temperature. This ensures the cake doesn’t melt the frosting in the next step.
- Step 2: Crumble the Cake
Once cooled, break the cake into large chunks and place them in a large mixing bowl. Use your hands or a fork to crumble the cake until it resembles fine crumbs. There should be no large lumps left in the bowl.
- Step 3: Mix in the Frosting
Add about half a cup of frosting to the cake crumbs. Use a spatula or your hands to mix it together until it reaches a dough-like consistency. You should be able to roll a ball that holds its shape perfectly without cracking.
- Step 4: Shape the Eyeballs
Scoop about one tablespoon of the mixture and roll it between your palms to create a smooth, round ball. Repeat this until all the mixture is used, placing the balls on a baking sheet lined with parchment paper.
- Step 5: Insert the Sticks
Melt a small amount of white candy melts. Dip the tip of each lollipop stick into the melted candy and then insert it halfway into a cake ball. This acts as glue to keep the cake on the stick. Place the tray in the freezer for 15-20 minutes to firm up.
- Step 6: Dip the Cake Pops
Melt the remaining white candy melts in a deep bowl. Dip each chilled cake pop straight down into the coating until fully covered. Gently tap the stick on the edge of the bowl to remove excess chocolate. Stand them upright in a cake pop stand or a piece of styrofoam.
- Step 7: Add the Iris and Pupil
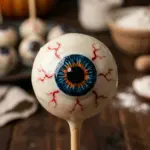
While the white coating is still slightly wet, press an M&M or a candy eye onto the center of the pop. If you are using M&Ms, use a black edible marker or a dot of melted dark chocolate to draw a pupil in the center of the candy once it is set.
- Step 8: Draw the Bloodshot Veins
Once the white coating has fully hardened, use a red edible ink marker or a toothpick dipped in red food gel to draw thin, squiggly lines radiating from the iris. This gives the cake pops their signature creepy, bloodshot look.