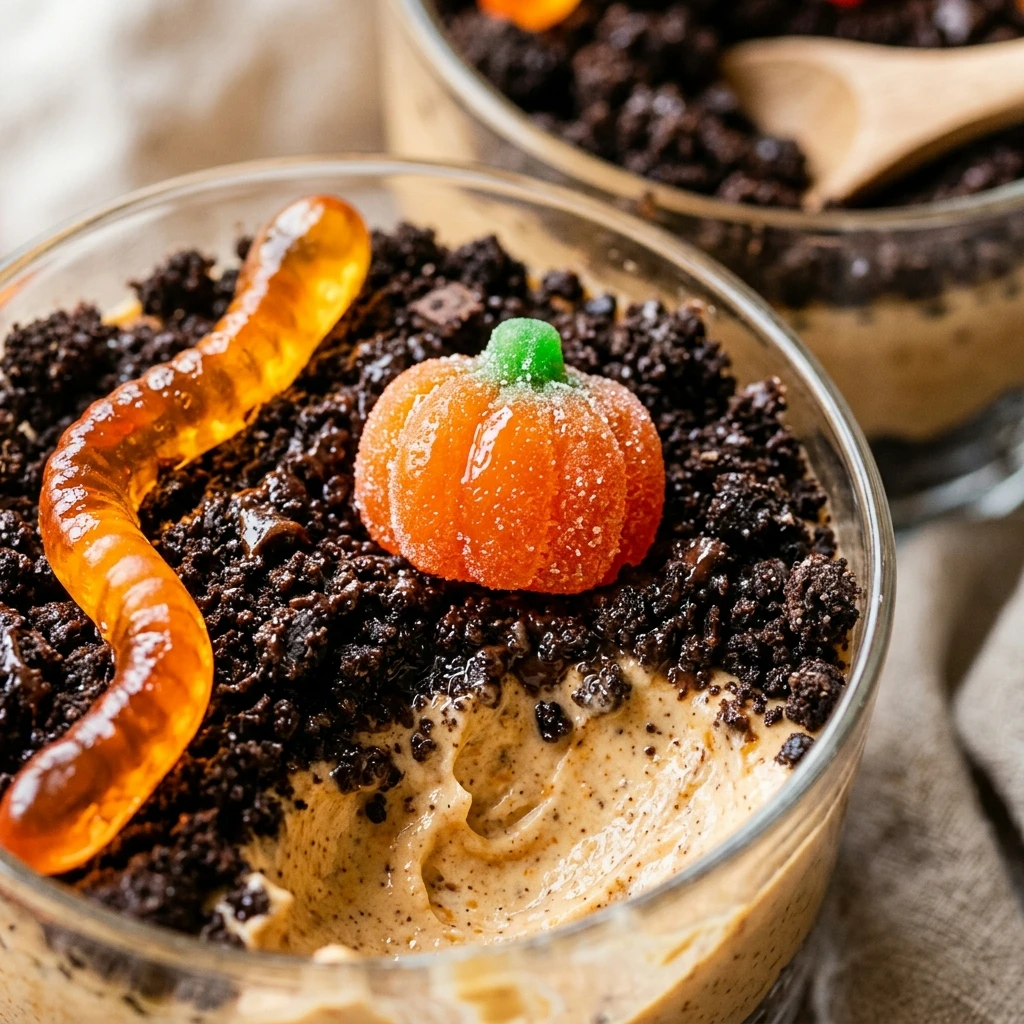

Fall is the perfect time to get creative in the kitchen with treats that are as fun to look at as they are to eat. These Pumpkin Patch Dirt Cups are a festive twist on the classic childhood favorite, bringing the charm of an autumn harvest right to your dessert table. They are incredibly easy to assemble, making them a fantastic activity for kids and a stress-free option for busy parents.
Whether you are hosting a backyard Halloween party or looking for a cute addition to your Thanksgiving spread, these dirt cups hit the mark. With layers of creamy chocolate “mud” and crunchy cookie “soil,” finished with adorable candy pumpkins, this dessert is guaranteed to put a smile on everyone’s face. Let’s dive into how you can create your very own edible pumpkin patch!
Recipe Information
- Prep Time: 20 minutes
- Cook Time: 0 minutes
- Total Time: 20 minutes
- Servings: 8 servings
- Difficulty Level: Easy
Nutrition Information
- Calories per serving: 340 kcal
- Protein: 4g
- Carbohydrates: 52g
- Fat: 14g
- Fiber: 2g
- Sugar: 38g
- Sodium: 460mg
Why Make This Pumpkin Patch Dirt Cups Recipe
This recipe is a winner because it requires absolutely no baking, which is a lifesaver during the busy holiday season. It uses simple, accessible ingredients that you can find at any grocery store. The combination of textures—the light, airy whipped pudding and the gritty, chocolatey cookies—creates a satisfying mouthfeel that adults and children alike enjoy.
Beyond the taste, these cups are highly customizable and visually appealing. Using clear cups allows the “geological” layers of the dirt to show through, making them a great decorative element for your party table. Plus, they are portion-controlled, making them easy to serve to large groups without the mess of slicing a cake or pie.
How to Make Pumpkin Patch Dirt Cups Recipe
Making this recipe is a simple process of crushing, whisking, and layering. It is a great way to get the kids involved in the kitchen since there is no heat involved. Follow these straightforward steps to build your pumpkin patch.
Ingredients
- 1 package (14.3 oz) chocolate sandwich cookies (such as Oreos)
- 1 package (3.9 oz) instant chocolate pudding mix
- 2 cups cold whole milk
- 1 container (8 oz) whipped topping, thawed
- 1 package pumpkin-shaped mellowcreme candies
- Green decorator icing or fresh mint leaves for garnish
Directions
Step 1: Crush the Cookies
Place the chocolate sandwich cookies into a large gallon-sized zip-top bag. Use a rolling pin or the back of a heavy spoon to crush the cookies until they resemble fine dirt or potting soil. You can leave a few larger chunks for a more “rocky” texture if desired. Set these aside in a bowl.
Step 2: Whisk the Pudding Mix
In a large mixing bowl, pour in the two cups of cold milk and the instant chocolate pudding mix. Whisk vigorously for about two minutes until the mixture starts to thicken and the powder is completely dissolved. Let it sit for five minutes to firm up.
Step 3: Fold in the Whipped Topping
Gently fold the thawed whipped topping into the chocolate pudding using a spatula. Mix until the color is uniform and no white streaks remain. This creates a fluffy, mousse-like consistency that is much lighter than plain pudding.
Step 4: Assemble the Soil Layers
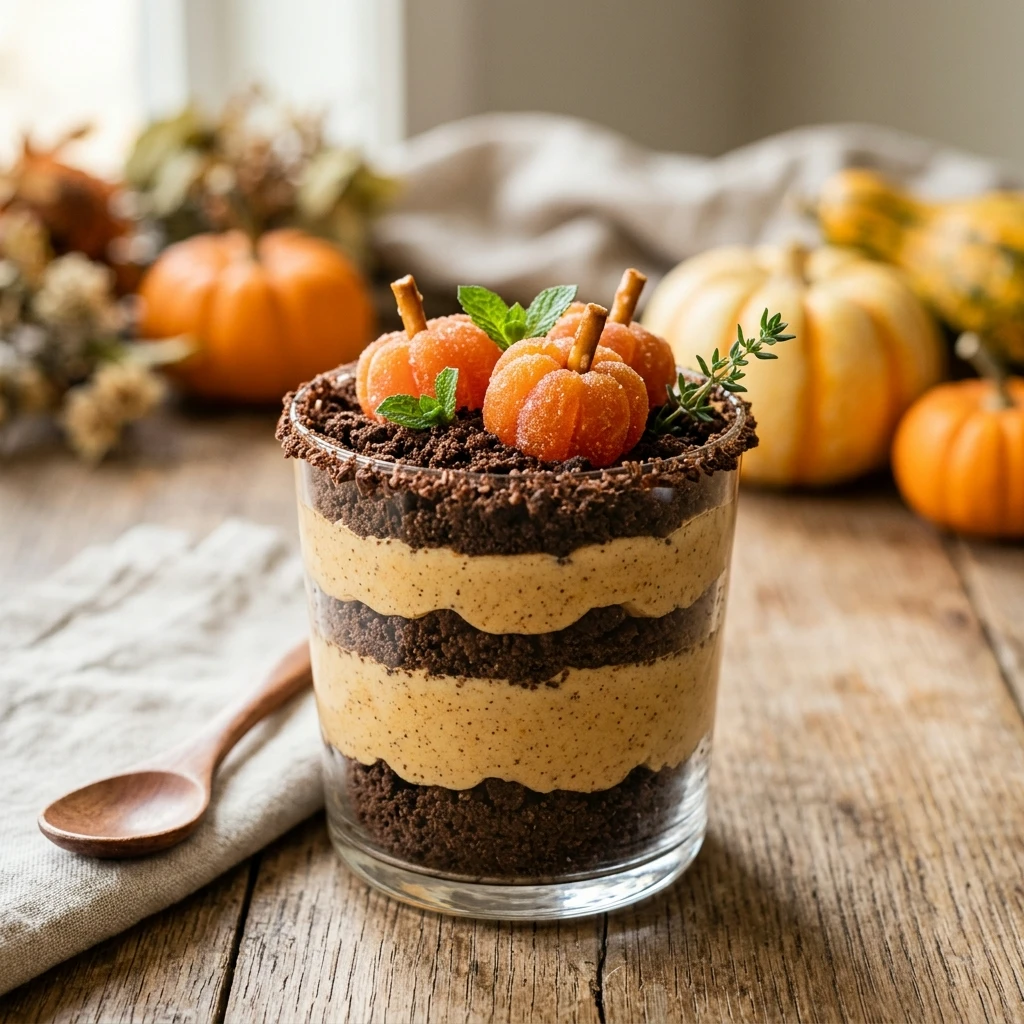
Take 8 clear plastic cups (9 oz size works best). Spoon about two tablespoons of the crushed cookies into the bottom of each cup. Follow this with a generous layer of the pudding mixture. Repeat the layers once more, ending with a thick layer of cookie crumbs on top to act as the surface of your “dirt.”
Step 5: Decorate the Pumpkin Patch
Place one or two candy pumpkins on top of the cookie crumbs in each cup. If using green decorator icing, pipe a small swirl or “vine” next to each pumpkin. Alternatively, tuck a small mint leaf next to the pumpkin to look like a leaf from the vine. Refrigerate for at least one hour before serving to allow the layers to set perfectly.
How to Serve Pumpkin Patch Dirt Cups Recipe
For the best presentation, serve these cups chilled on a rustic wooden tray or a tray covered with autumn-colored leaves. You can provide small wooden spoons to keep with the garden theme. If you are serving these at a party, you can even place a small “Pumpkin Patch” sign in one of the cups to add to the festive atmosphere.
How to Store Pumpkin Patch Dirt Cups Recipe
These dirt cups should be stored in the refrigerator. If you aren’t serving them immediately, cover each cup with plastic wrap to prevent the pudding from drying out and the cookies from absorbing too much moisture from the fridge air. They will stay fresh for up to 3 days, though the cookie crumbs will soften the longer they sit.
Expert Tips for Perfect Pumpkin Patch Dirt Cups Recipe
To ensure your dirt cups look and taste their best, use cold milk straight from the fridge; this helps the instant pudding set quickly and firmly. When crushing your cookies, a food processor can be used for a very fine, uniform “sand” texture, but the bag-and-rolling-pin method is usually more fun and results in a more natural look. If you find the pudding is too soft, let the assembled cups chill for a full four hours to ensure they hold their shape when scooped.
Delicious Variations
You can easily swap the chocolate pudding for vanilla pudding tinted with orange food coloring for a “bright” pumpkin look. For a different flavor profile, try using golden sandwich cookies for a “sand” look or chocolate graham crackers for the dirt. If you want to add more texture, mix in some mini chocolate chips or gummy worms along with the pumpkins for a classic dirt cup experience.
Frequently Asked Questions
Q: Can I use homemade whipped cream instead of whipped topping?
Yes, you can use homemade stabilized whipped cream. However, non-dairy whipped topping (like Cool Whip) holds its shape longer at room temperature, which is helpful for parties.
Q: Can I make this recipe vegan?
Absolutely! Use dairy-free chocolate sandwich cookies, almond or soy milk, and a vegan-friendly instant pudding mix. Be sure to use a vegan whipped topping alternative as well.
Q: How far in advance can I make these?
You can make them up to 24 hours in advance. The cookie crumbs will lose some crunch over time, so if you prefer them very crunchy, add the top layer of crumbs and the pumpkins right before serving.
Q: What if I can’t find pumpkin mellowcreme candies?
You can use orange-colored candy melts, orange jelly beans, or even small pieces of orange segments to represent pumpkins in your patch.
Q: Can I make this in one large bowl instead of individual cups?
Yes, you can layer the ingredients in a large glass trifle bowl or a 9×13 inch pan for a “community” pumpkin patch that guests can scoop from.
Conclusion
The Pumpkin Patch Dirt Cups Recipe is a delightful, whimsical dessert that captures the essence of fall in a single cup. It is the perfect balance of chocolatey goodness and festive fun, requiring minimal effort for maximum impact. Whether you’re making them for a school event or a cozy night in, these treats are sure to be a seasonal favorite. Happy “planting” and even happier eating!

Pumpkin Patch Dirt Cups Recipe

- Cook Time: 20 minutes
- Total Time: 20 minutes
- Diet: Vegetarian
Ingredients
- 1 package (14.3 oz) chocolate sandwich cookies (such as Oreos)
- 1 package (3.9 oz) instant chocolate pudding mix
- 2 cups cold whole milk
- 1 container (8 oz) whipped topping, thawed
- 1 package pumpkin-shaped mellowcreme candies
- Green decorator icing or fresh mint leaves for garnish
Instructions
- Step 1: Crush the Cookies
Place the chocolate sandwich cookies into a large gallon-sized zip-top bag. Use a rolling pin or the back of a heavy spoon to crush the cookies until they resemble fine dirt or potting soil. You can leave a few larger chunks for a more “rocky” texture if desired. Set these aside in a bowl. - Step 2: Whisk the Pudding Mix
In a large mixing bowl, pour in the two cups of cold milk and the instant chocolate pudding mix. Whisk vigorously for about two minutes until the mixture starts to thicken and the powder is completely dissolved. Let it sit for five minutes to firm up. - Step 3: Fold in the Whipped Topping
Gently fold the thawed whipped topping into the chocolate pudding using a spatula. Mix until the color is uniform and no white streaks remain. This creates a fluffy, mousse-like consistency that is much lighter than plain pudding. - Step 4: Assemble the Soil Layers
Take 8 clear plastic cups (9 oz size works best). Spoon about two tablespoons of the crushed cookies into the bottom of each cup. Follow this with a generous layer of the pudding mixture. Repeat the layers once more, ending with a thick layer of cookie crumbs on top to act as the surface of your “dirt.” - Step 5: Decorate the Pumpkin Patch
Place one or two candy pumpkins on top of the cookie crumbs in each cup. If using green decorator icing, pipe a small swirl or “vine” next to each pumpkin. Alternatively, tuck a small mint leaf next to the pumpkin to look like a leaf from the vine. Refrigerate for at least one hour before serving to allow the layers to set perfectly.