Cherry Cheesecake Jars
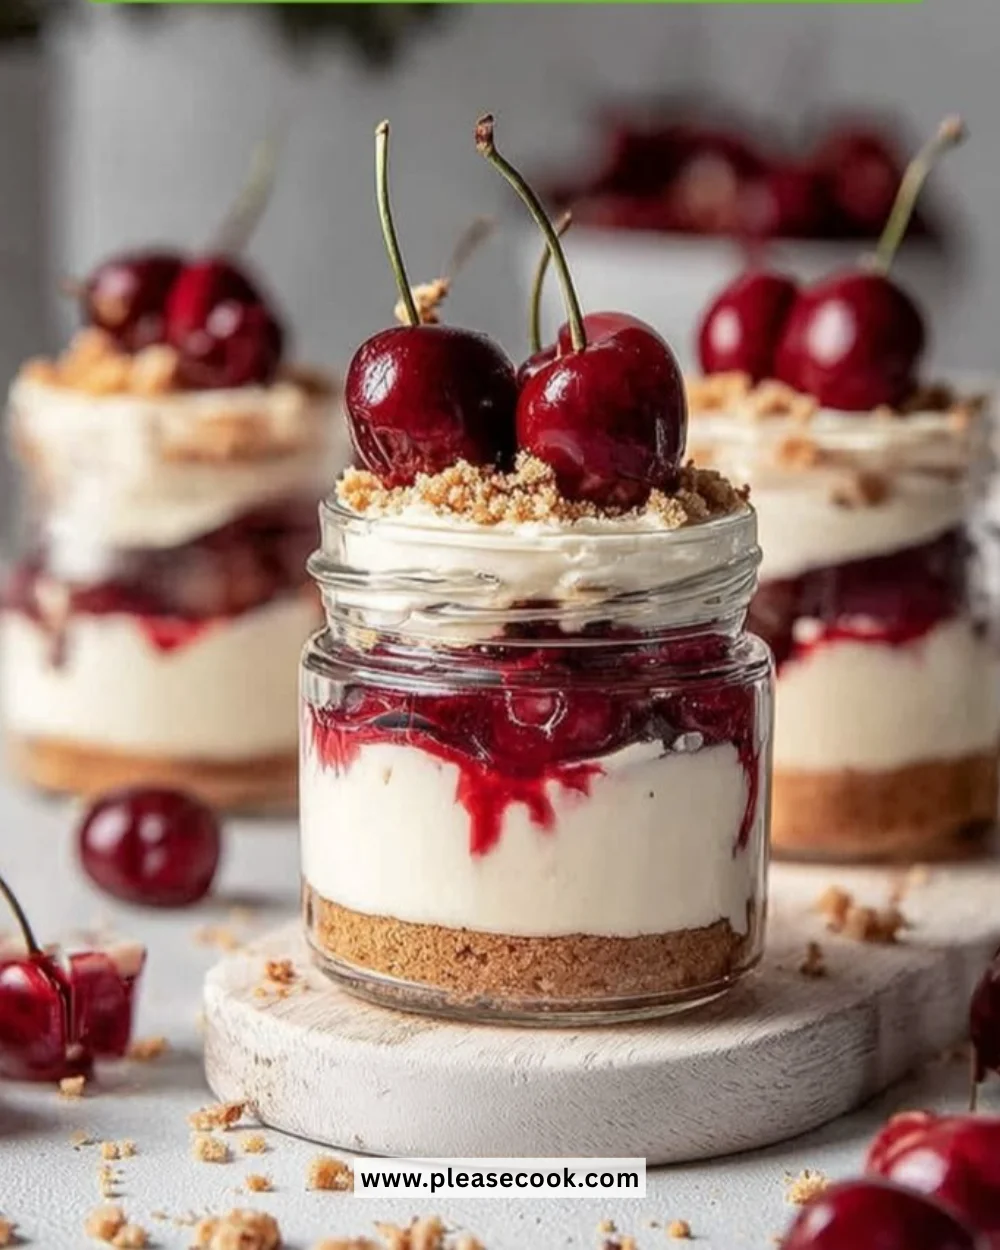
Cherry Cheesecake Jars are the perfect combination of creamy cheesecake and sweet cherry topping, all packed into a cute little jar. This no-bake dessert is not only easy to make but also delightful to look at. Whether you’re hosting a party, celebrating a special occasion, or want to treat yourself, these jars offer an individual serving that is as visually appealing as it is delicious.
Recipe Information
- Prep Time: 15 minutes
- Cook Time: 0 minutes
- Total Time: 15 minutes
- Servings: 4
- Difficulty Level: Easy
Nutrition Information
- Calories per serving: 260
- Protein: 5g
- Carbohydrates: 30g
- Fat: 12g
- Fiber: 1g
- Sugar: 18g
- Sodium: 150mg
Why Make This Cherry Cheesecake Jars
There are plenty of reasons to make Cherry Cheesecake Jars! Firstly, they are a breeze to prepare, requiring minimal effort with maximum reward. Secondly, their individual servings mean they are convenient for grab-and-go desserts. Plus, they’re a hit with both kids and adults alike! The creaminess of the cheesecake layer balances perfectly with the sweet and tart flavor of the cherry pie filling, creating a delightful taste experience. And best of all, no baking is required, so anyone can whip these up in no time.
How to Make Cherry Cheesecake Jars
Ingredients:
- 1 cup cream cheese, softened
- 1/2 cup Greek yogurt
- 1/4 cup sugar
- 1 teaspoon vanilla extract
- 1 cup cherry pie filling
- Graham cracker crumbs for layering
- Fresh cherries for garnish
Directions:
### Step 1: Preparation
In a mixing bowl, beat the softened cream cheese, Greek yogurt, sugar, and vanilla extract together until smooth and creamy. This will be the star layer of your dessert, so take your time to ensure it’s perfectly blended.
### Step 2: Layering
In jars, layer the cream cheese mixture. Start with a generous spoonful, then add a layer of graham cracker crumbs. Follow this with a delightful layer of cherry pie filling. This stacking technique not only adds to the taste but also makes the presentation stunning.
### Step 3: Repeating Layers
Repeat the layers until the jars are filled to the top. Aim for at least two layers of the cream cheese mixture and cherry filling to create contrast and flavor. This will give each jar a satisfying depth and texture.
### Step 4: Finishing
Garnish each jar with fresh cherries on top. This final touch not only adds a pop of color but enhances the overall cherry flavor. Then, refrigerate for at least 2 hours before serving to allow the flavors to meld and the mixture to set.
How to Serve Cherry Cheesecake Jars
Serve these charming jars chilled. They make for an elegant dessert at dinner parties or family gatherings. Pair with a cup of coffee or tea for a delightful afternoon treat. For a special touch, serve alongside some extra cherry pie filling and whipped cream for customization.
How to Store Cherry Cheesecake Jars
You can store the Cherry Cheesecake Jars in the refrigerator for up to 3 days. Cover the jars tightly with lids or plastic wrap to keep them fresh. Since this is a no-bake dessert, they can be made a day ahead, making them the perfect make-ahead option for entertaining.
Expert Tips for Perfect Cherry Cheesecake Jars
- Use a hand mixer or stand mixer for a smooth consistency that ensures no lumps in your cheesecake mix.
- If you want extra flavor, consider adding a splash of lemon juice or zest to the cheesecake mix.
- For a gluten-free version, substitute graham crackers with gluten-free cookie crumbs.
- Ensure your cream cheese is adequately softened; this will make the mixing process much smoother without any lumps.
- If cherries aren’t your thing, feel free to substitute the cherry pie filling with any fruit of your choice, such as blueberries or strawberries.
Delicious Variations
- Chocolate Cherry Cheesecake Jars: Blend in some melted chocolate to the cream cheese mixture for a decadent twist.
- Nutty Delight: Mix in some crushed nuts like pecans or walnuts into the cheesecake layer for added crunch.
- Tropical Flavor: Swap out the cherry filling for mango or passion fruit puree for a tropical vibe.
- Swirled Styles: Add a layer of fruit puree before the cherry filling to create beautiful swirls in the jar.
Frequently Asked Questions
-
Can I make these jars in advance?
Yes! These jars can be prepared a day in advance. Just make sure to store them in the refrigerator before serving. -
What if I can’t find cherry pie filling?
You can use fresh or frozen cherries cooked down with sugar to create your own homemade cherry topping. -
Can I use low-fat cream cheese?
Absolutely! Using low-fat cream cheese and Greek yogurt can create a lighter version of this dessert without compromising too much on flavor. -
How long do these last in the fridge?
Cherry Cheesecake Jars can be stored in the refrigerator for up to 3 days. After that, the fresh flavors may start to fade. -
Can I freeze these jars?
Freezing is not recommended as it may affect the texture of the cream cheese layer, but the filling can be frozen separately.
Conclusion
Cherry Cheesecake Jars are a delightful way to indulge in a classic dessert while keeping it simple and manageable. Their charming presentation and delightful flavors make them the perfect choice for any occasion. Whether you enjoy them at a get-together or as a sweet treat during a quiet evening at home, this recipe is sure to impress. So gather your ingredients, and give these lovely jars a try—you and your guests will be glad you did!